Wednesday, May 25, 2011

Scale Reproduction

Scale reproduction is a technique used by many artists to reproduce an image at a different size. This is done by putting a grid over the image and then drawing a larger grid on the painting. For example, the original image will have a 1x1cm grid on it while the larger image has a 2x2cm grid on it, this allows the artist to copy what is in each box easily.

My scale reproduction painting is about gambling. I found two images that can be scaled and put on my painting. The first one is a picture of some casino coins.


The second image I used is an image of a hand of cards.


I doubled the size of both images on my painting and started painting with acrylic paint and a small brush. It took me a while to do the cards but it turned out pretty good. Here is a shot while I'm working.


After I was done with the whole painting. I noticed that my painting made gambling look good because the background is quite bright and everything looked joyful so I had to come up with a quick way to make gambling look bad. Since my background was orange, I could paint some parts black to make it look like smoke from a fire. I made the smoke using a large dry brush and dark grey paint. It accidentally turned out better than I thought. Here is an image of my final work.

Tuesday, April 5, 2011

Self Portrait - Stage 3


This is my finished product. I added different objects I liked in the background, a Camera, Minecraft dirt block, MacBook Pro, and a video game controller. I used the select and move tools to select the shape of the keys and paint them, then duplicate them when making the keyboard of the MacBook Pro. I played with low brush opacities when make the shadows for the dirt block. I added a blue gradient background using the gradient tool. I used blue because I felt like it and it was one of my favorite colors. I also added other versions of me, a normal one, and a crazy one with a plastic bag. They are both transparent in the background to blend in and I used the soft light layer style to make them blend in. The three versions of myself represent that I do many things, I like to go out as represented in my left picture with a cap, I like to draw as represented with my manga styled middle one. And the last one represents that sometimes I go crazy and do crazy things like putting a bag on my head.

Self Portrait - Stage 2


This is my portrait in it's second stage. I redone everything. I scanned a drawing of myself to trace in GIMP. I then used a high opacity sharp brush to outline my hair and then used the paint bucket tool to color the rest of my hair. I also used this technique for my face, glasses, eyes, and shirt. I used a low opacity blue for my glasses so that they are transparent enough for the eyes to be visible from a layer underneath. I also put drop shadows under the glasses using the layer filter.

Tuesday, March 15, 2011

My Self-Portrait - Stage 1


Here is my first stage of my self-portrait. It is not much yet because I was going to make shadows in illustrator but I wasn't allowed to. After trying to make it in GIMP, I figured that it is too hard. I will scan a drawing of myself at home and color it in GIMP, this can be done quickly. Then I can make my background.

Monday, February 28, 2011

Famous Self-Portraits


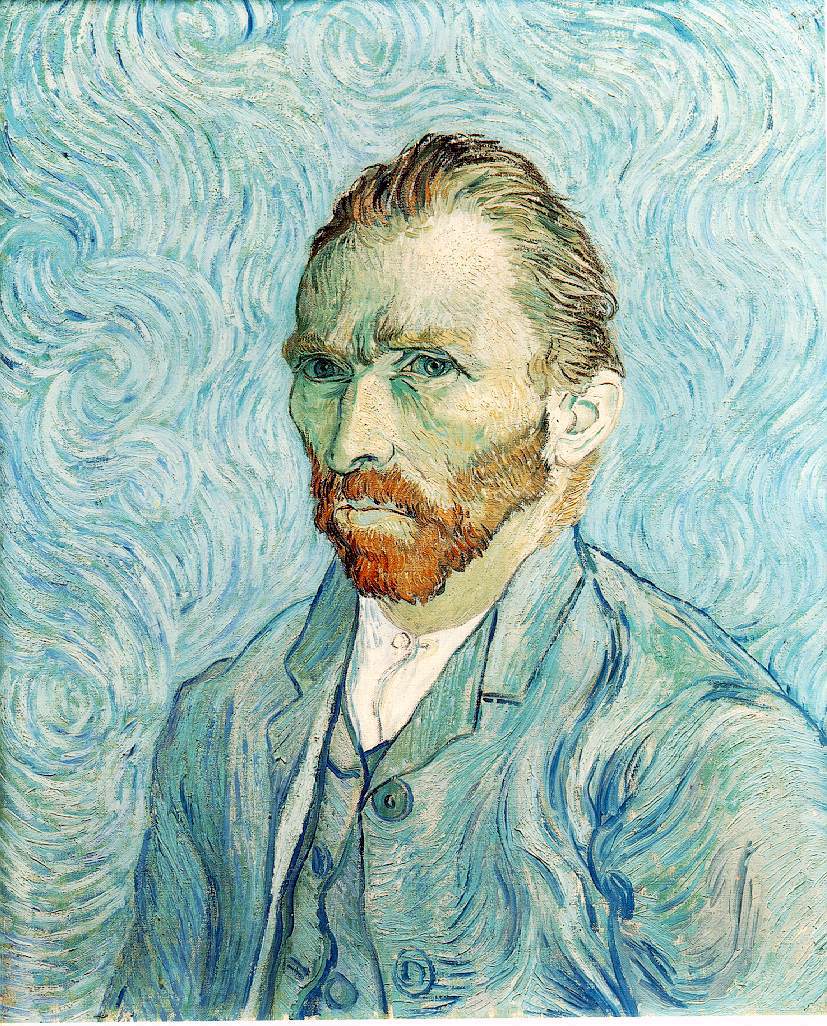
Vincent Van Gogh's Self Portrait (1889, Oil Canvas)


This self portrait was painted in 1889 depicting Vincent Van Gogh himself using oil paint on a canvas 65x54cm large. It is now stored at the Musee d'Orsay, Paris.

Works Cited
"WebMuseum: Gogh, Vincent Van: Self-Portraits." Ibiblio - The Public's Library and Digital Archive. Web. 01 Mar. 2011. .


Leonardo Da Vinci's Self Portrait (1512)

This portrait was the only self portrait that has survived by Leonardo Da Vinci. In it he has depicted himself as an ancient man, even though he was only 60 years old at the time this painting was finished.

Works Cited
"Leonardo Da Vinci: Self-portrait, 1512." TheArtWolf.com - Art and the Art World. Web. 01 Mar. 2011. .

Monday, January 10, 2011

Two Point Perspective


Two point perspective art is quite different from one point perspective art in some ways. Objects drawn in two point perspective tend to have a more natural look than when drawn in one point perspective.

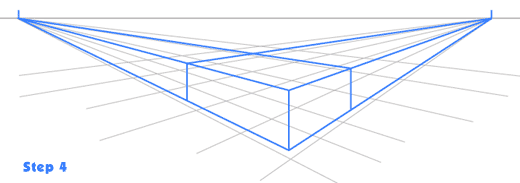
In order to draw in two point perspective, you can plot two vanishing points opposite of each other on the paper and then make a triangle with those 2 lines, you can then draw lines one centimeter apart from each other leading to the same points.

My first design was a roll of toilet paper with my name on it. It didn't really work out because the roll of paper was a cylinder, cylinders are quite hard to do because they don't have edges. A way to do them is to draw them using a cube as a guide.

My second design was a world full of blocks, specifically "Minecraft", a video game where you play with blocks, I liked this idea because cubes are easy to do in two point perspective and that allows me to draw many things using cubes.

Some difficulties I had during painting was that I got some shades wrong and it was hard to get he same mix of color every time I had to paint something, this really made me paint things several times over and over again to get the shading right.


After that you can add a cube using the lines and start drawing. But make suer that everthing will have at least three shades of color, the face, top. and side.


The solution I had to that problem was to use mixes from other people that I would need so I wouldn't mess up my own mixes that I may have to use later if I made a mistake. After finishing the painting I really enjoyed this unit in grade 8 art and I would like to try to use more curves if I get to work in this type of unit again.

Thursday, April 22, 2010

Masks! w00t :D

Wikipedia defines masks as "an article normally worn on the face, typically for protection, concealment, performance, or amusement." I think masks are a useful and creative way to add a touch of character to yourself if you are participating in a performance. Cheaper masks are normally made out of rubber or thin plastic while more expensive, professional masks are made of silicone or plaster.

Wednesday, November 25, 2009

[UPDATE] Sea Creature Sculpture


My sea creature sculpture is now in the process of paper-mache stage. It is going pretty fine and one side is now covered with brown paper.

Some problems I had was with the brown paper not going around the edges. I solved them with thinner strips of paper.

Sunday, October 11, 2009

Sea Creature Sculpure


Creature: Clown Fish

Why: I chose this fish because I think it is not too hard to make from bottles.

Materials Needed:
- 5 Medum sized milk bottles
- Tape
- Newspaper
- Glue

I think I will make this sculpture by taping 3 medium sized bottles together then sticking one more at each end of the bottles. The tape should make a skeleton of the fish so I could paper mache it and paint.


Tuesday, September 29, 2009

Making a Name Tag with One Point Persprective

Requirements:
- Pencil
- Straight Edge Ruler
- Eraser
- A4 Paper
- Acrylic Paint

Procedure

1. Cut the A4 piece of paper in half

2. Choose where to put the vanishing point, for this example the vanishing point will be at the top of the paper.

3. Grid the paper, all the vertical lines should lead to the vanishing point. The horizontal lines should stay level with the paper.

5. Draw your name anywhere on the grid.

6. Paint your name and the background.

7. You're done!

Thursday, August 13, 2009

0N3 P01N7 P3R5P3C71V3

ONE POINT PERSPECTIVE IS A STYLE OF DRAWING THAT GIVES THE FEELING OF DEPTH BY MAKING ALL OBJECTS VANISH INTO ONE POINT SOMEWHERE IN THE PICTURE.
Cassette in one point perspective
SOME OBJECTS WHEN DRAWN APPEAR LARGER THAN THEY ACTUALLY ARE, FOR EXAMPLE, THE PICTURE ABOVE.

ONE POINT PERSPECTIVE IS USEFUL WHEN SKETCHING ROOM LAYOUTS LIKE THE IMAGE BELOW.
A kitchen in one point perspective

THE VANISHING POINT

THE VANISHING POINT (VP) IS THE POINT WHERE ALL THINGS MEET. ALL THE HORIZONTAL LINES WILL END AT THE VANISHING POINT.


SOURCE: www.ider.herts.ac.uk/school/courseware/graphics/one_point_perspective.html